Saturday, June 30, 2018

Winter Wheat Sunlight or Portrait of a Blade of Grass

Winter Wheat Sunlight
24 x 30 inches acrylic on gallery wrapped canvas
photo reference my own

This painting I decided to stay a bit closer to home......in fact right outside our house. This barn is at the top of the hill in the front field. The deep green grass by the fence row in the foreground is actually planted in winter wheat. This is done, in the early fall, mostly to keep the bare ground from washing away with winter rains. One really neat thing about winter wheat is that is sprouts in the fall, just when all the summer greens have faded, and even the trees are starting to loose their fall colours. Often in the dead of winter, when everything is a shade of gray......you'll see a field of winter wheat, all bright and spring green......and it'll remind you that spring isn't too far away.

I took my source photo, that we'd taken one afternoon on our walk, and I laid it out on a vertical canvas, using sponge brushes. I was interested in using the late afternoon shadows to compose a “Z” type pattern. 


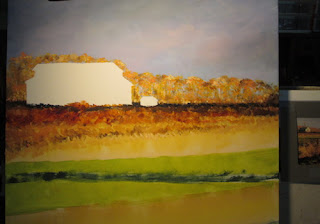
I had left the barn covered while I painted in the sky and line of trees, so's I didn't have to be too persnickety about staying in the lines of the barn.


By now I had basically done the top half of the painting. For the bottom half I needed to establish the winter wheat and the afternoon shadow......but without too much detailing.....after all I was going to paint grass all over it!


Here I am using a loooooong brush to paint in the many, many, many blades of grass. I know it looks like I'm painting too many grass blades......but it's really kinda relaxing. After you get the flow of how you need to swish up then down with the brush......it's fun!


After I finished the painting, and had it hung up on the wall.......it was a treat to have the afternoon sunlight flow across that winter wheat green.....and really light it up! Nature and art co-existing!

Saturday, June 23, 2018

Romantic Roses or Mapping out a Technique

Romantic Roses
8 x 10 inches- stretched canvas
Acrylic paints from my photo

This blog post is all about organizing steps to a particular painting technique....and some pretty roses. I wanted to cement in my mind some basic steps to painting with opaque paints in a slightly impressionistic stye. Flowers are really great for exploring technique.....they have lovely colours, they usually are great “models” for resource photos, and they have many complex surfaces that do really nice things for shadows.

So I picked a reference photo out of my stash, choosing one that had the flowers backlit in the sunlight on the counter. The first step was to get rid of the “white canvas syndrome” by setting up the composition in stark black and white terms.....by outlining the roses with black paint and just leaving a white silhouette of the roses. I then began to lay in some “local color” i.e. pinks for the actual roses. I'm just laying in swaths of colour without doing much of anything for detailing. I just want to “sketch in” the form of the roses.


The first stark black and white only layer was to get my value composition set. It was the strongest the composition was ever going to be.....but it lacked any colour/detailing/beauty. By layering in greyed pinks I began modeling the roses in colored values. This allowed me to put in just those colours that showed the modeling of the form of the roses while still keeping the strength of the stark dark and light of the original layer.

After having done the composition and value portions of the technique flow.....I next turned to the aspect of warm and cool colors and the “push/pull” of how they can be used to visually push back or pull forward a form. The flowers were in a “high key” or very light in value, so I put out some light value warm and cool colors and began painting. 


As I modeled the roses' forms, I tried to constantly remind myselves that I only needed those details that established the roses' forms and that what the painting “needed” was the most important goal. I wanted the focus of the painting to be on the lowest rose so I did the most modeling/detailing on that rose. It also had the most intense colours and the most contrast of value and warm/cool colors. 


I think I accomplished my immediate goal of trying out my “simplify” plan of painting......and showing off some pretty pink roses.


Wednesday, June 6, 2018

It's Raining Kewpie Dolls!......or How a Media Blitz Helped Win the Vote for Women

It's Raining Kewpie Dolls
8 x 11 inches Watercolours and acrylic paints on watercolor board 
Basic photo reference a family photo of my grandmother

This week's blog is about a fun mixed media piece called It's Raining Kewpie Dolls. I had done the original watercolour painting of the two women dressed in 1910 era clothes a while back. I did the watercolour from an old family photo of who I believe was my grandmother and a relative (?) who was pointing up in the sky. In my watercolour, to show what the relative was pointing at, I made up the shadow of a bi-plane .....and adjusted the second figure so she was looking up. But once I was finished with adding colours …... I didn't quite know where the watercolour needed to go to finish the itty bitty story. It sat in the finished bin until recently. 

I've been working on a painting series about the effort to win women the right to vote. The 100 year anniversary for the passage of the 19thAmendment is coming up in August 2020. In my reading I came across a neat story about what would be called today a media event. Apparently in November 1914 a convention of the National American Woman Suffrage Association was held in Nashville Tennessee. A week after the convention, at the Nashville Fairgrounds a female pilot, Katherine Stinson staged an air plane demonstration. As she flew over the assembled crowd, she let loose a shower of Kewpie dolls with little banners saying “Votes for Women”. The itty bitty dolls floated down on tiny yellow parachutes. Well, I couldn't let an artistic opportunity like that pass me up!

I pulled out the watercolour, and began sketching Kewpie dolls.


I did a bit of altering of the original watercolour to fit the facts on the ground, so to speak. Since the Kewpie doll event was actually in November and was described as quite cold, I gave the girl looking up a heavy white suit coat to go along with her elbow length gloves. Using acrylic paints, I changed the background scenery to a more autumn dull green. Then I got down to painting Kewpie dolls. I made up a parachute, and painted them “raining down” on the crowd.

A quick bit about Kewpie dolls......they were popular line of figurines based on illustrator Rose O'Neill's cherub-faced comic strip character. She became one of the highest paid female illustrators in the country from the use of the Kewpie image in advertising as well as sale of the dolls. They became a household name.....and in addition to appearing on a throng of household items, were used by Rose O'Neill to promote the women's suffrage movement.
Needless to say, I was quite gratified to learn that in that even in that era (1910), a (female) illustrator not only thrived.....but flourished with her art!

I got to tell a bit about a past era's effort to win the vote for women.....and got a great story ending for my original watercolour painting.